Skip to content

Little Princess

$6.90 $11.50
Unit price  per 

Product Information
🚚 Shipping Starts: Sold-out for this season
📦 Quantity per Package: 10 Bulbs

Specifications
☀️ Light Required: Full Sun / Partial Shade
🌷 Height: 6"
🌸 Blooming Period: Mid Spring
🌱 Bulb Size: 6/+
Planting Distance: 3-4"
Planting Depth: 4"
📍 Hardiness Zone: Zone 3-9
🦌 Deer Resistant: No
💐 Minimum Bulbs for Effect: 10-15
Little Princess

About Little Princess

Behold the Tulip Little Princess! Get ready to be charmed by this enchanting floral beauty that will make your garden reign supreme. With its vibrant hues and graceful presence, the Tulip Little Princess is the reigning monarch of springtime blooms. Claim your throne in the garden with the Tulip Little Princess. Here's why it deserves a place in your royal garden.

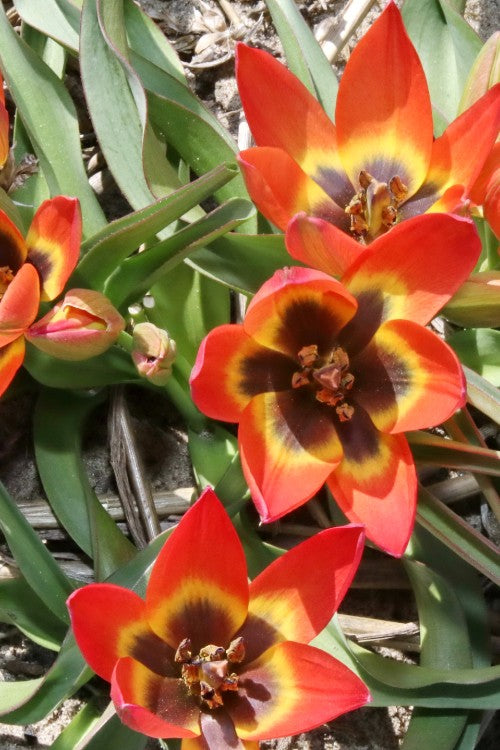
  • Majestic majesty: The Tulip Little Princess boasts elegant red petals with delicate orange in the middle, creating a regal and captivating appearance.
  • Petite perfection: Standing at a modest height of 10-12 inches (25-30 cm), this compact tulip is perfect for borders, containers, or adding a touch of royalty to your floral arrangements.
  • Early bloomer: Prepare to be delighted as the Tulip Little Princess makes her grand entrance early in the spring, bringing a burst of color to your outdoor kingdom.

How to plant and take care of Little Princess

  • Soil and Sun: Plant your Tulip Little Princess in well-draining soil under full sun or partial shade for optimal growth.
  • Royal Rest: After blooming, allow the foliage to wither naturally to replenish the bulb's energy. This ensures a stunning display of regality in the following season.
  • Frost Protection: If frost threatens, cover your Tulip Little Princess with a layer of mulch to protect it and ensure its long-lasting beauty.
  • Watering Wisdom: While this princess appreciates regular watering, be sure not to drown her. Allow the soil to dry between watering sessions to maintain her royal vitality.

Frequently Asked Questions

Caring for Little Princess tulips is essential to ensure their vibrant blooms. Here are some tips to care for these beautiful flowers. Firstly, choose a well-draining location with full sun or partial shade for planting. The soil should be fertile and slightly acidic. Water the tulips regularly, keeping the soil moist but not waterlogged. During dry spells, provide supplemental watering. Apply a balanced fertilizer before planting and again in early spring. Deadhead the faded flowers to redirect energy towards bulb growth. After blooming, allow the foliage to wither naturally before removing it. Protect the bulbs from extreme cold by applying a layer of mulch.

Timing is crucial when planting Little Princess tulip bulbs. It is recommended to plant them in the fall, ideally around late September to early October. This timing allows the bulbs to establish their root system before winter sets in. Planting too early in warmer weather can lead to premature growth, while planting too late may not give the bulbs enough time to establish roots. Aim for a time when the soil temperature has cooled down but is still workable. However, it's worth noting that specific planting times may vary depending on your location and local climate.

After planting the bulbs in the fall, they enter a period of dormancy during winter. As spring arrives, the bulbs start developing roots beneath the soil's surface. This root establishment typically takes several weeks. Once the roots are established, the foliage emerges, and the tulips begin to grow. From the time of planting to blooming, it usually takes about 12 to 16 weeks for Little Princess tulips. However, this timing can be influenced by various factors such as climate, and the weather conditions. Regularly monitoring the growth progress and considering the estimated bloom time for the specific cultivar will provide a more accurate timeline.

Planting Little Princess tulip bulbs is a straightforward process. Follow these steps for successful planting.
• Start by selecting a location with well-drained soil and adequate sunlight.
• Prepare the soil by removing any weeds or debris and loosen it to a depth of about 8 inches.
• Dig a hole that is approximately three times the bulb's height, or around 8 inches deep.
• Place the bulb in the hole with the pointed end facing upward.
• Space the bulbs about 4 to 5 inches apart, allowing them enough room to grow.
• Fill the hole with soil and gently firm it around the bulb, ensuring there are no air pockets.
• Water the area thoroughly to settle the soil.
• Remember to label the planted area to avoid accidental disturbances.

Premium Dutch Quality

Safe Shipping

Value for Money

#1 Customer Service